How to fire FB pixel events when visitors click-through on your landers

Zeno
Last Update 7 months ago
Many of you will use Facebook as a traffic source and will accordingly want to use the FB pixel at every opportunity to track user events, e.g. landing page visits, clickthroughs and of course conversions.
With conversions, you must be able to embed client-side code, e.g. Javascript or Iframes, on your offer conversion pages.
If the offer owner or affiliate network does not provide this, then there is no way to fire the FB pixel events on a purchase event. No tracker can help make this happen as the code must be fired client-side by the user for Facebook to track the event.
There are exceptions when you have a lot of data on the users and can use offline conversions, but this is not the case in 99% of situations.
Below we will describe two ways to fire Facebook pixel events when users click-through on your landing pages. This is a moderate value event that shows intent from users, so may be useful for your Facebook reporting and for custom audiences.
Note: it would be worth reading this article first to get familiar with the more basic implementation of Javascript redirection for outgoing links.
Option 1: Simple on-page Javascript events
If you can edit your lander and are happy implementing basic code changes, this is the best method.
Here, you will create a function that fires FB events, then add an onclick attribute to any links ( elements) where you want this to happen.
The big advantage of this is that you remove a redirect from the system and likely get your visitor from A > B faster. It also lets you do more dynamic event processing and manipulation in advanced situations.
Step 1: Add FB Javascript to your page
It goes without saying that you are going to need Facebook's pixel tracking JS on your page. Paste this in the region or wherever appropriate for your situation.
Now, let's add a function to the end of it for firing events on click:
See that extra part?
Here we are defining a very simple function to push a "Lead" event to Facebook.
We will now make this event happen when you click on a button.
To do this, just add onclick="fireCTAevent();" to any element where you want a click to trigger the event, e.g.
You can add this onclick event to almost anything, and likewise you could make many different events to fire leads, add to cart, complete registration events, etc.
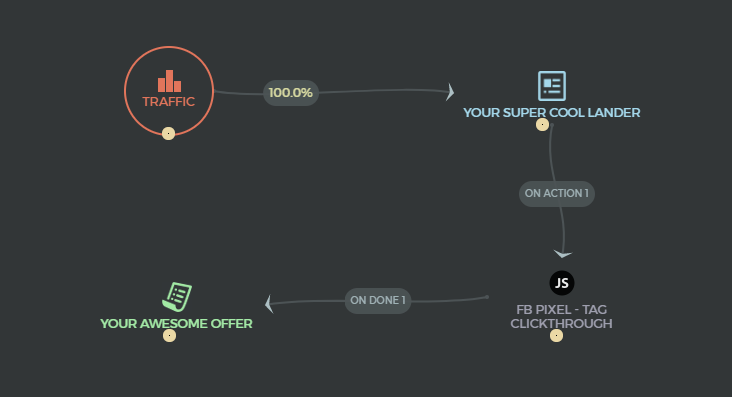
Option 2: FunnelFlux's Javascript nodes
Here, you can use the advanced Javascript nodes within the funnel editor to tag people as they pass through to your offer, like so:
Within the Javascript node, place your FB Javascript code, edit it to describe the event as desired, and set the time delay before redirect. FB Javascript executes very quickly in most cases so 500 ms should be fine:
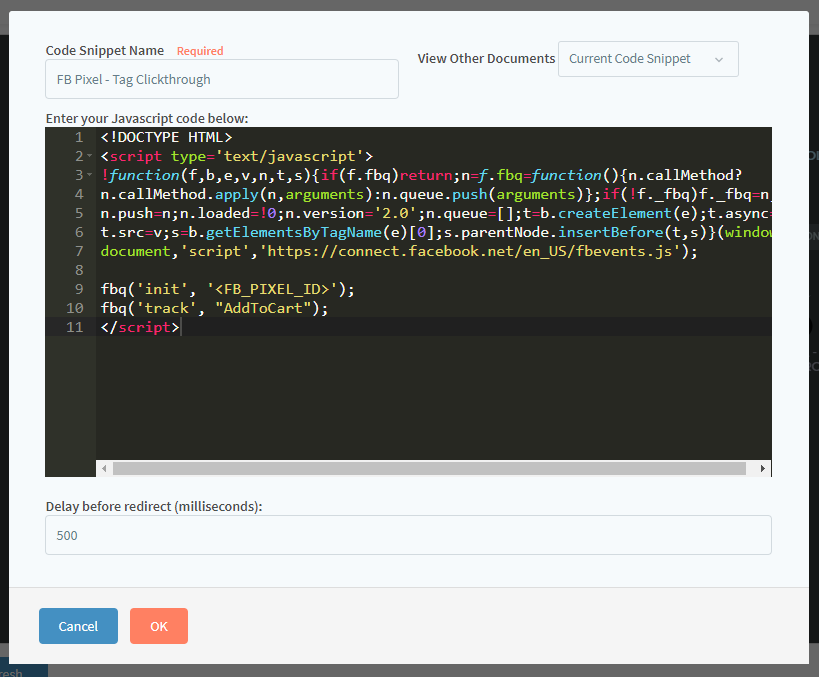
Here I have used a basic AddToCart event to represent a lander clickthrough, since it is the most analagous event. You could also use custom events, its up to you.
Option 3: Use JS to completely control link redirection
Here we will get a little more advanced with JS and create functions to listen to and execute events when people click on links.
We will remove the href parts from links so that navigation is controlled by JS, not by the elements themselves.
Step 1: replace outgoing CTA links
For this step, you need to take basic links that would normally go to FunnelFlux actions and rewrite them. For example, take:
and replace it with:
Do this for all outgoing FunnelFlux action links. If using multiple actions, change the class names to CTA1, CTA2, etc.
You can use IDs as well but I am going to assume you will have multiple CTA links where you want all of them to behave in the same way.
Step 2: add Javascript to control click events
Here your goal is to let Javascript take over the outgoing click events and do a few things to create a comprehensive tracking situation:
-
Fire the FB pixel
-
Append an image pixel for tracking events from third parties
-
Wait to give time for those events to go through
-
Redirect the browser to your FunnelFlux action link
The following code can be placed in the footer of your lander, before to do this. Note this is example configuration, it is up to you to configure this for your situation and we strongly recommend using the Chrome extension "FB Pixel Helper" to check for events firing.
Note: be sure to put your general FB tracking code earlier in the page so that it is available, othere fbq.track events won't work at all.
Note: you can exclude the jquery part if you already have it included earlier.
This code will fire a Lead event on clickthrough, append an image pixel, and after 500 ms redirect to your action 1 link.
If you would like to do more advanced tracking, you can use custom Facebook events and fill these with URL parameters, as well as add code to handle CTA1, CTA2, etc.
Below is a fully-featured example:
As with all tracking matters, make sure you test your code and config first before using in production.